Article takeaways
- A container home, also called a cargo home, is a house partially or entirely constructed from shipping containers.
- Container homes can cost as little as $10,000 for a basic DIY build or as much as $400,000 for a custom architect-designed residence.
- Shipping container homes are safe to live in when properly engineered, permitted, inspected, and finished with non-toxic materials.
- Standard, high cube, and refrigerated containers each come with distinct trade-offs in cost, ceiling height, and insulation that affect the build from the ground up.
- Hidden costs like permits, foundation work, insulation, and utility hookups can add $30,000 or more to a container home budget if not planned for upfront.
- Self storage is a practical tool both during the build process and after move-in, helping container home owners protect belongings and manage space in a compact living environment.
At this point, the fact that securing a house is more challenging than it’s ever been is common knowledge.
And it’s not just the cost of buying a home–new or old–that has us dreading the process. Lumber and other essential house-building materials are, at best, more expensive and, at worst, harder and harder to come by.
We’re all looking for ways to reduce our cost of living. So it’s no wonder that homebuilders around the country have been captivated by container homes–houses built from shipping containers.
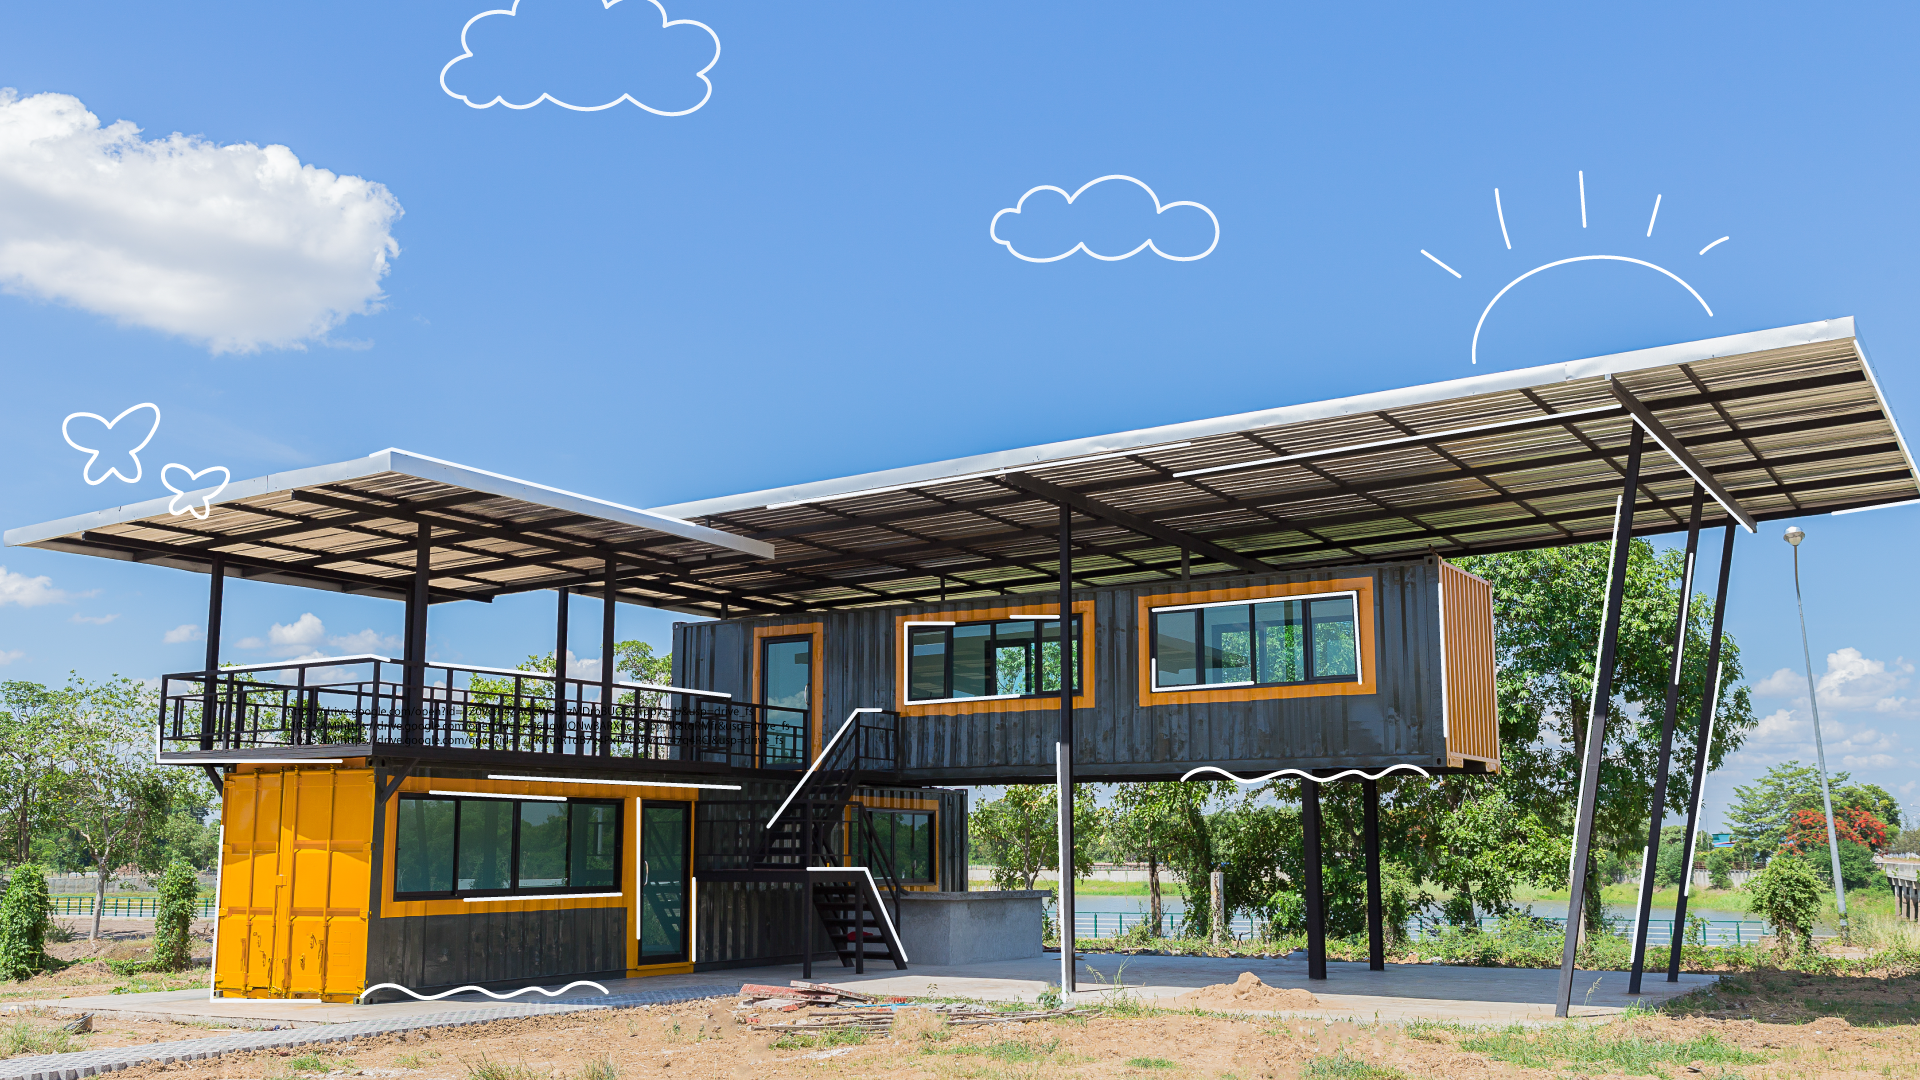
Container homes are more than just affordable. They’re stylish, unique, sustainable, and efficient. The design flexibility in shipping container living allows you to flex your creativity. Plus, they go up fast.
Whether you’re building a studio space, casita, or family home on your property or a house for yourself, you’ve come to the right place. This helpful guide explains what a container is in depth. We’ll cover how to build a container home, how much a container home costs to build, and if a container home is safe.
We’ll also explore how short-term self storage can help you during the container home renovation process and how long-term self storage can aid your container living. Last but not least, we’ll reveal how SelfStorage.com’s signature search tool can help you find affordable self-storage close to your container home property.
What Is a Container Home?
Shipping container homes or cargo homes are houses constructed from repurposed ISO shipping containers. Container homes can be long-and-narrow single-container designs, multi-container homes, or hybrid concepts that combine shipping containers with traditional construction.
ISO or intermodal containers refer to the standardized freight containers used for global transport. Shipping containers are typically either 20 feet or 40 feet long, and the container size used will obviously change the square footage of the living space.
Intermodal containers are specifically designed to guarantee uniformity, safety, and stacking and organizational conformity on ships, trucks, and trains during shipment. It’s these safety and stackable features that make steel shipping containers an ideal choice for DIYers, builders, and architects to convert into eco-friendly homes and studio spaces.
- In their simplest, single-container form, container homes are usually shotgun-style living spaces, long, slender, and rectangular.
- That said, there are multi-container designs where builders weld multiple containers together to enlarge their structure.
- They can weld multiple containers together to form a large single-story home, or stack and weld for a multi-story shelter.
While lots of cargo homes are open concept or “studio style,” there are more elaborate designs that section off rooms and integrate hallways throughout.
It’s common to assume that DIY container homes are “off-the-grid” living situations, and many of them are. But there are also completely modernized container homes hooked up to all the local amenities and services.
Another common misconception is that cargo homes are new. It’s true that, thanks to the ever-increasing cost of owning a home, DIY container homes are trending. But container homes came into practice in the mid-2000s.
Repurposed shipping container structures have been used for office buildings, school classrooms, storefronts, greenhouses, and even container pools internationally for decades.
And it’s not just DIY builders who use shipping containers to build homes. There are contractors and companies specializing in prefab homes who have integrated shipping containers into their design schemes.
What Types of Shipping Containers Are Available?
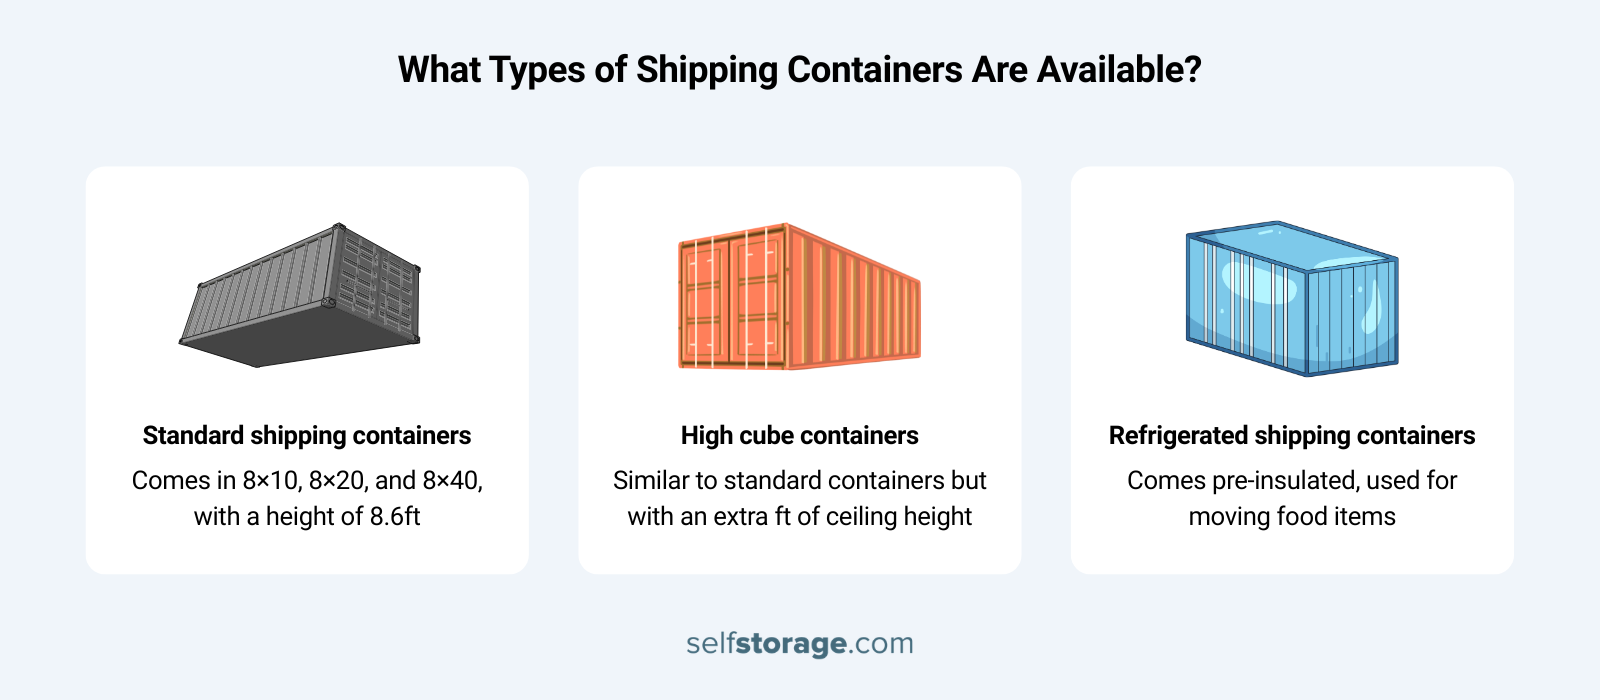
Before diving into drafting your shipping container home plans, you’ll want to get familiar with the different types of containers. Each type comes with its own set of advantages and disadvantages. Understanding exactly what you need and weighing it against what’s available is an effective first step.
Standard Shipping Containers
- Standard shipping containers, often called general-purpose containers, come in three handy sizes: 8×10, 8×20, and 8×40. All of them have a height of 8.6 feet.
- Despite their compact size, Standard containers are rugged. After all, they were designed to fit on trains and endure long rides.
- While the smallest end of the standard container offers a living space just shy of 100 square feet, they can be stacked or placed side by side.
High Cube Containers
- High cube shipping containers are similar to standard containers but offer an extra foot of ceiling height.
- This added space can be a real lifesaver for homeowners building a shipping container home, especially when the time comes to add insulation.
- Just keep in mind that the extra space comes at a price. High cube shipping containers tend to be about 50% more expensive than their standard counterparts.
Refrigerated Shipping Containers
- Reefer containers, short for refrigerated shipping containers, are typically used for moving food items like dairy, meat, and produce.
- One cool thing about using a reefer container for your home is that it comes pre-insulated, which isn’t the case for standard and high cube containers.
- But keep in mind that reefer containers come with their own set of challenges.
- The downsides include a higher price, maintaining the refrigeration system, and dealing with a less typical flooring setup.
How Much Does a Container Home Cost?
The price of your container home can vary based on its size, condition, and features. Small and modest cargo homes might cost between $10,000 and $35,000. But a large architect-designed showpiece of a container home with modern amenities can range between $100,000 to $200,000 and up, plus the cost of land.
Remember that buying a prefabricated container home is cheaper, since amenities are already built in. A custom build will typically be more expensive to account for the fabrication, materials, and labor.
Before you start sketching out your container home plans, we suggest sketching out a realistic picture of what you’re actually going to spend. Are you ok with a modest $10,000 build, or are you looking for a one-of-a-kind $400,000 art piece of a home?
The gap between these price points comes down to a lot more than just the containers themselves. But the container choice is definitely a factor.
The Cost of the Containers Themselves
The price of your corrosion-resistant steel shipping container depends on whether you’re purchasing a new, “one-trip,” or used shipping container, and what size.
A new container or a one-trip unit that’s only made a single overseas voyage will run $2,500 to $6,000 for a 20-footer. A 40-footer beefs the price tag up to $5,000-$8,000.
Used containers can drop that figure significantly, often to $1,500 to $3,500 for a 20-foot unit. That said, be sure to inspect a used container in person before you buy it. Check for rust, structural damage, and chemical floor treatments before committing to the sale.
Budget Builds: $10,000–$35,000
At the lower end of the spectrum, you’re looking at a modest container home project using one or two used containers with minimal finishing. The range is typically between $25,000 and $35,000.
Think exposed walls, basic electrical or solar panel rig, a composting toilet, and no HVAC beyond a window unit. These builds work well as off-grid cabins, studios, or guest structures.
Owner-built projects can cost as low as $10,000. That said, most major municipalities won’t permit a budget build as a primary residence, so this tier comes with real limitations unless you’re building in a rural area with minimal qualifications.
Mid-Range Builds: $50,000–$100,000
This is the sweet spot for most people building a container home as a full-time residence. At this price point, you’re working with a licensed contractor, pulling proper permits, and installing traditional utilities. That means full plumbing, electrical, a mini-split HVAC system, and a concrete slab or pier foundation.
Interior finishes in a mid-range build might not be lavish, but they’re livable and comfortable. Mid-range container homes include drywall, standard cabinetry, a functional kitchen, and a bath. Costs at this tier vary considerably depending on your region, the materials you use, and how accessible your build site is.
High-End and Showpiece Custom Builds: $150,000 and Up
Once you get into architect-designed territory, the cost can climb between $150,000 and $400,000 or up. These builds often involve four to eight containers and require structural engineers alongside architects and welders/fabricators.
At the high-end level, it’s worth noting that the per-square-foot cost frequently exceeds traditional construction. But the appeal of a high-end, customized shipping container home is no longer savings and DIY aesthetic; it’s the unique design.
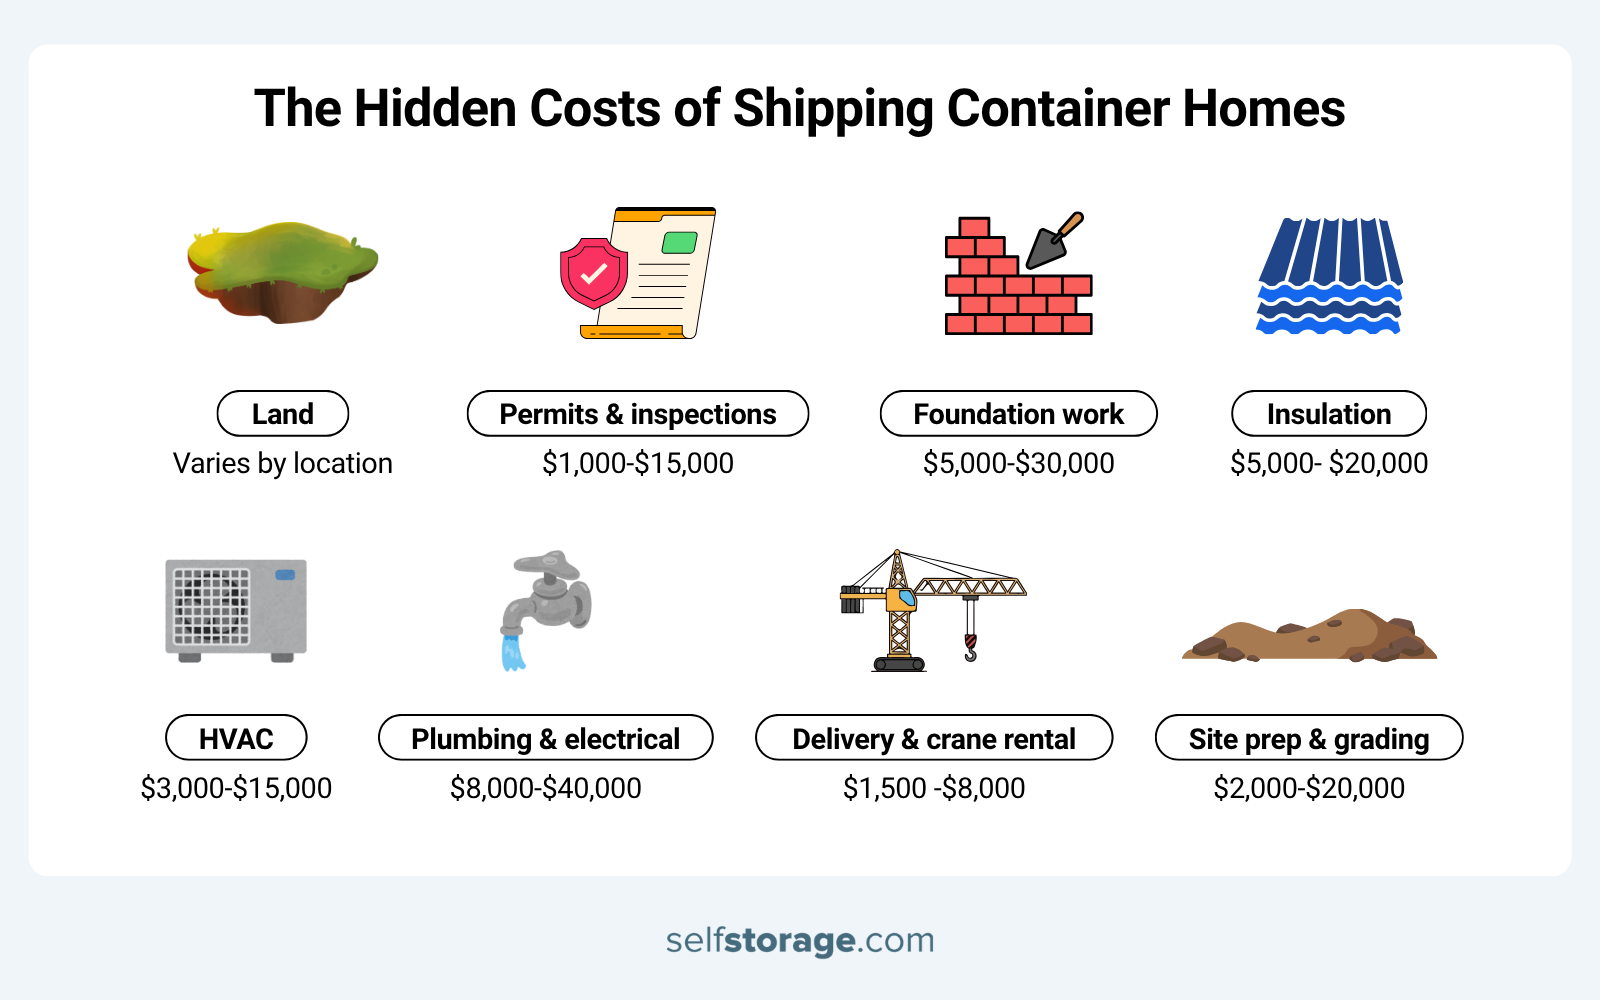
The Hidden Costs of Shipping Container Homes
There are hidden costs of building out a shipping container home that catch more than a few first-time container home builders off guard. The container is just the starting point. You’ll also need to factor in:
- Land varies enormously by location.
- Permits and inspections, which can run $1,000 to $15,000 and more in jurisdictions that lack an established permitting pathway for container homes.
- Foundation work, typically $5,000 to $30,000.
- Insulation, which is non-negotiable in steel structures and often runs $5,000 to $20,000
- HVAC, $3,000 to $15,000.
- Plumbing and electrical can cost $8,000 to $40,000 altogether.
- Delivery and crane rental to get the containers on-site, usually $1,500 to $8,000
- Site prep and grading cost from $2,000 to $20,000, depending on the terrain.
How Does It Compare to Traditional Construction?
Budget container builds and typical costs from $100 to $120 per square foot, which genuinely undercuts traditional stick-frame construction in many markets.
Mid-range container homes cost around $150 to $250 per square foot, which puts them roughly in line with conventional building costs. High-end container homes, though, can push $250 to $450 per square foot, which is more expensive than traditional builds but also more rugged and more unique.
How to Build a Container Home — Step by Step
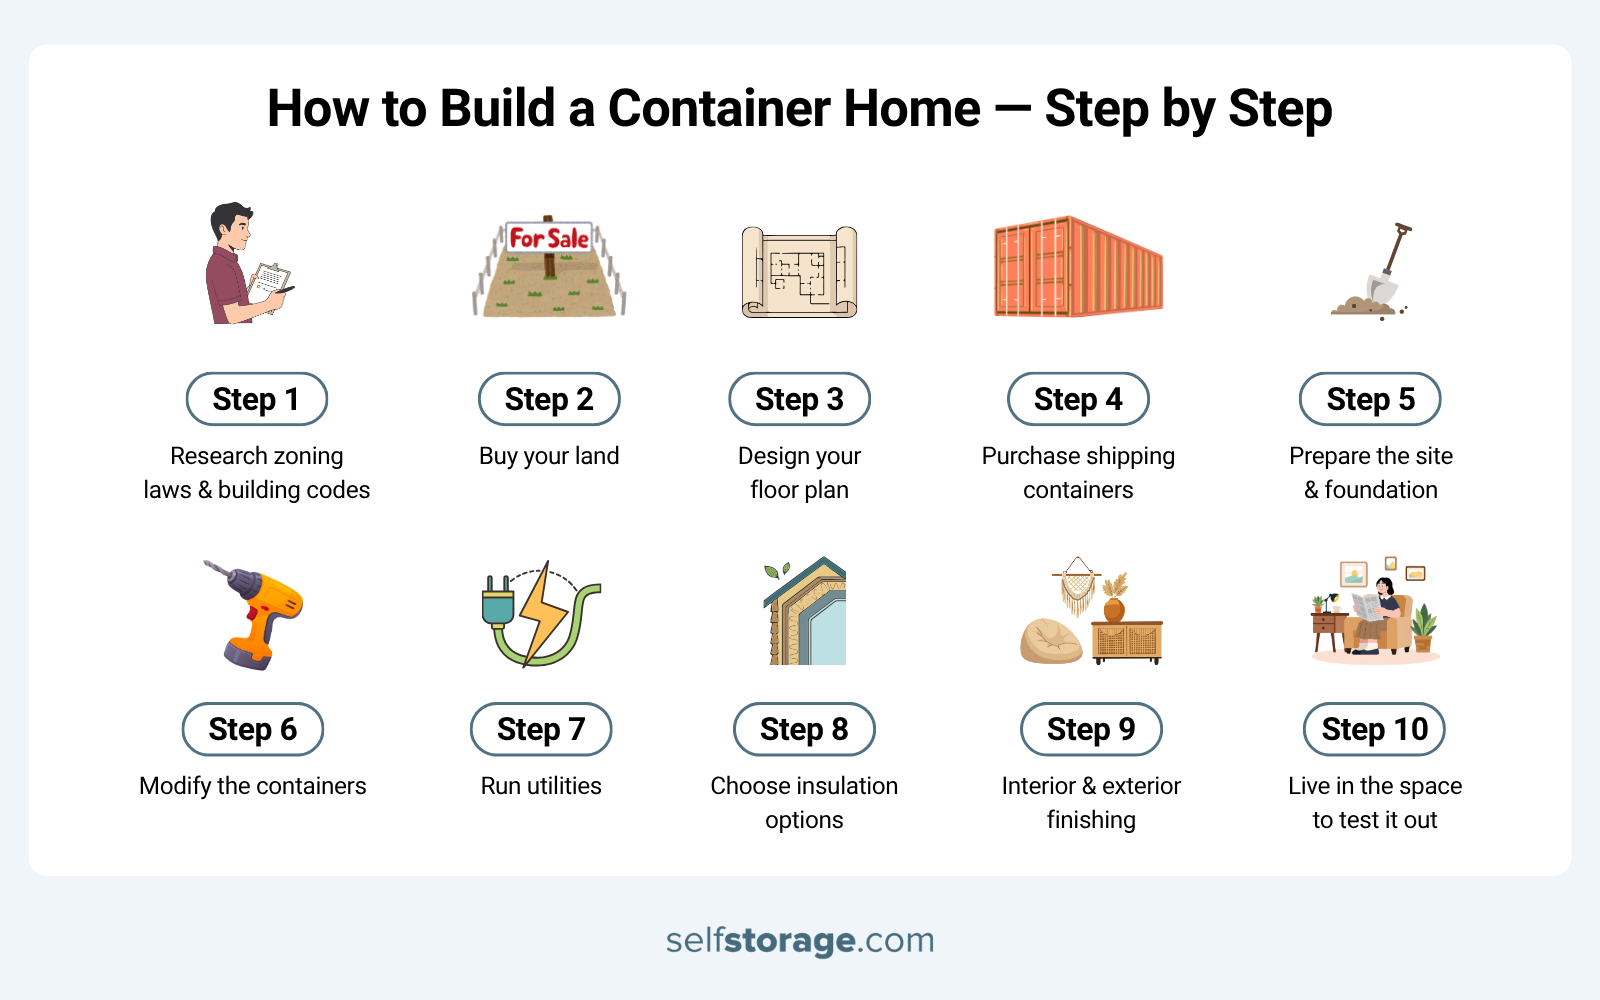
Now that we understand exactly what a container home is and the associated cost of building one. Let’s jump into a step-by-step process of how to build a container home.
Step 1: Research Local Zoning Laws and Building Codes
All states and municipal areas have building and zoning rules that builders need to follow when planning new construction projects. And planning your dream shipping container home is no different.
You’ll want to make sure you research the necessary permits required and regulations you’ll need to follow beforehand for a smooth process.
- There are some states and municipal areas that have a pipeline already laid out for container home construction.
- These areas tend to be more accommodating and flexible about your builds.
And if you’re planning on hosting your cargo home as a rental on Airbnb, keep in mind that Airbnb has its own regulations you’ll need to consider. Double-check that your local regulations permit Airbnb rentals. In some cases, it’s allowed, but you have to pay special registration fees.
Step 2: Buy Your Land
The next step in the container home building process is to score your plot of land. Unless you have a family member or friend with land to spare, there are two primary paths you can take here:
- Dive into some DIY research on platforms like Realtor.com and Zillow: Going DIY might take a bit longer, but it can be a thrilling, hands-on journey of discovering your own perfect plot of land.
- Team up with a helpful realtor: On the flip side, finding the ideal realtor may take some time, but they can lead you to hidden gems you might miss on your own.
Whichever route you choose, keep your specific lifestyle goals in mind. If amenities and utilities are a must-have, be sure the plot of land you’re purchasing is in proximity to them.
There’s a difference between shopping plots of land that are already hooked up to a utility grid and “raw” land. Raw land refers to a plot where you’ll need to arrange your own connections for sewer, water, and electricity, either by hooking up to the main grid or equipping water collection systems, wells, and solar panels.
Consider the vibe you’re looking for. Do you want desert, mountains, or woods? And don’t forget to think about how easy it’ll be to drop your containers onto the plot.
Once you find the land you’re looking for, we suggest having a lawyer assist with the paperwork.
Step 3: Design Your Floor Plan
Once you have your land picked out, you can use your land map to start laying out your container home. We suggest creating a floor plan before you buy your containers, so you know exactly what you need.
Whether you want a simple one-container build, an eco-friendly place made from recycled shipping containers, a multi-container design, or a small compound of container homes, you want to start with an accurate map of the land plot.
This is the step when you decide whether you’re going to design and build yourself, use a prefabricated container home kit, or work with an architect and make something a bit more complex.
Container homes may be on the cozier side, but that can be a plus when it comes to flexible and creative layout concepts. They said, there are a few container living staples you’ll need to keep in mind while mapping out your dream home:
- Clever storage solutions: Save space by using a separate container as a storage shed or booking a self storage unit nearby.
- Loft spaces: Lofts are a cozy and practical place to put your bed.
- Versatile areas: Think movable or multi-purpose furniture that transforms a space from an office to a TV room, to a dining area.
You can always connect multiple containers for a larger first floor. Or you can opt for a two-floor stack setup. Just be sure to consider how you plan to build stairs if you’re adding a second floor or rooftop deck. Stairs can impact your wall and floor space.
And remember, while containers used for container homes are either 20ft or 40ft long, you need to consider insulation. We recommend allowing about 6 inches on each side for the insulation padding. So, for example, a 20ft container gives you 19 feet of interior space for living, since 6 inches on each end will be stuffed full of insulating materials.
Step 4: Choose and Purchase Your Shipping Containers
Now that you’ve secured your plot of land and drafted your floor plan, the next step is shopping for your container. The number of containers you’ll need all comes down to how much square footage you’re looking for. Here’s a quick guide:
- You’ll get 320 square feet of space per 20-foot standard container.
- Each 40-foot standard container offers 640 square feet.
If your layout included vertical flair, like a loft bed area or an attic for extra storage, height is key. Keep in mind that, while standard containers have a height of 8’6”, high-cube containers give you an extra foot at 9’6”.
That said, 20-foot high-cube containers are a hot commodity and might be harder to get your hands on. In contrast, 40-foot high-cube containers are generally more accessible.
For builders in the tiny house movement, a single container might do the trick. But if you envision a larger, multi-level masterpiece, you’ll need several containers.
We suggest looking into the”one-trip” container options. These are slightly lower in price than brand-new containers. But since they’ve only seen one load of dry goods cross the ocean, they need little to no maintenance or painting.
Step 5: Prepare the Site and Foundation
Before your shipping containers get to your property, take a stroll around your site to pinpoint the perfect spot for your new home. Here are a couple of important things to ponder and, if relevant, to chat about with your contractor:
- Land Grading: You want to make sure your building area is nice and level so your container house sits flat. But it’s equally as important to ensure your building ground is stable so your foundation doesn’t sink or slip. Often, this involves a soil check-up. If the soil is too moist, for instance, you might need to add some gravel to keep everything steady beneath your container.
- Choosing Your Foundation: You’ll need to pick a foundation type for your container home. We suggest either a pier, pile, slab, or strip foundation for a container home.
- A pier foundation is budget-friendly and quick to set up, made from concrete blocks or piers.
- A pile foundation features steel tubes driven into the ground with a concrete top for added support.
- Then there’s the slab foundation, where a concrete slab is poured directly under your container, offering a sturdy base.
- A strip foundation combines piers with slabs, using concrete strips to support the container’s perimeter.
Once your chosen foundation is ready, you’re all set to drop your shipping containers on top.
Step 6: Modify the Containers
Shipping containers come with a flat roof as standard. While you may be tempted to keep the flat roof as is, adding a sloped roof can give you extra height and help with water drainage. So it’s not strictly necessary to add a roof since the container already has one. But most architects suggest doing so to enhance the drainage and functionality.
You have four standard container home roof styles to consider:
- Traditional pitched roofs are ideal in areas with harsh weather conditions like heavy rain or snow.
- Flat roofs are the easiest and quickest, and are cheaper upfront, since they come standard on the container. But bear in mind, they can be quick and collect sitting water and might be pricier to maintain in the long run.
- Green roofs, or living roofs, involve adding plants and greenery on top of your container home for natural cooling, insulation, and water absorption.
- Terrace roofs can expand your living space with a patio or rooftop deck above your home. But you’ll have to plan for stairs or a ladder.
You’ll also want to consider ventilation needs, like pipes for the bathroom and kitchen. and other design elements like skylights, while you’re planning your roof. That way, you’re not duplicating your work later on. And don’t forget that you’ll have to cut out your doors and windows at this stage as well.
Keep in mind that cutting openings for doors and windows can reduce the structural integrity of shipping containers. We suggest working with your contractor to add necessary reinforcements as compensation for the loss of support. The extra support infrastructure is doubly critical if you’re stacking containers in a two-story container house concept.
These supports might alter your layout slightly, but by planning the modifications all at once ahead of time, you have the chance to integrate the mods with intention. That can mean placing them where a kitchen cabinet can go. You might lose a tiny bit of storage, but you can find ways to compensate for that, such as booking a self storage unit nearby.
Step 7: Run Utilities
Once your container home’s structure is nice and stable, it’s time to start framing the interior. You’ll want to tuck in the plumbing and electrical systems behind the walls as you frame.
Adding electrical and plumbing components makes your container home more than just functional, but also makes it a cozy, livable space.
But to do that, you’ll have to make some creative choices:
- Solar panels: Ideal for living off-grid or simply saving on electricity costs.
- Outdoor bathroom facilities: Natural outhouses add a rustic touch for those building container houses for living off-grid or as camping rentals.
- Well water connection and filtration: If you’re on well water instead of town supply or a rain capture system, ensure everything’s working well, and any filters are in place.
- Internet: Even if your cargo home is in the middle of nowhere, an internet connection can be a game-changer for entertainment and staying in touch with the world.
Remember, utilities can be tailored to suit your lifestyle. An Airbnb host might opt for all the modern conveniences, while empty nesters or off-grid enthusiasts may only want the essentials.
Step 8: Insulation Options
Utilities aren’t the only amenity that keeps your shipping container home comfortable. Insulation is key to a cozy container house. Here are a few insulation techniques you can try:
Add insulation between the container walls and the interior to help maintain a pleasant internal temperature.
Use a vapor barrier to fend off water damage, mold, and mildew.
Seal any and all new openings, like windows, to avoid annoying water and air leaks.
Keep in mind that without proper insulation and seals, you won’t be able to winterize your home when the cold months arrive.
Step 9: Interior and Exterior Finishing
The next step is to add interior walls and flooring, and watch your container home come to life. This is the point where you install your cabinets, countertops, and other custom features.
If you’re a minimalist living in a single-container tiny home, space might be tight. You can install built-in furniture like Murphy beds and tables, and fold them up when they’re not in use. We suggest triple-checking your floor plan before you start installing these finishing touches. Once cabinets are in place, it’s a lot more complicated and costly to make changes. And you’ll want to wait to do your flooring until after you install your cabinets, so you’re not tearing up brand new flooring to make space.
We suggest you give everything a thorough cleaning after you’ve installed your drywall. And be sure to lay some tarps down to protect your flooring before you paint.
Then, you can dive into the finishing touches, making choices that make your house feel less small:
- Appliance Installation: We suggest sticking to compact appliances that meet your needs without overtaking your space.
- Decor and Art: Create visual height with vertical elements like tall bookcases and artwork hung high on the walls. Making sections or “zones” using area rugs, furniture arrangement, and different lighting can help add depth to a smaller space.
- Furniture: Try having one main piece of furniture, like a comfy couch, and keeping the rest smaller and functional.
- Curtains: Hang curtains close to the ceiling and extend the rods beyond the window frame to make windows appear larger and ceilings higher.
- Lighting: A single overhead light fixture can make a room feel flat and small. We suggest layering different types of lighting: ambient lighting for overall illumination, task lighting for specific activities, and accent lighting to create visual interest. This layering creates depth and makes rooms feel bigger.
The interior finishing stage is where you have a chance to get creative with your storage solutions. We already talked about using flip-up furniture. But maybe you can find some pieces that have storage space built in.
Think about using Tupperware in closets and a pulley system for overhead storage.
Take advantage of vertical space with wall-mounted and floor-to-ceiling storage that draws the eye upward. Utilize hidden storage hacks behind sofas and under stairs to keep essentials accessible but out of sight.
And last but not least, book a self storage unit nearby and rotate things like tools and wardrobe based on your current needs. Even just rotating seasonal items can free up 30-50% more usable space.
Step 10: Live in the Space to Test it Out
After setting everything up, give yourself some time to live in the space. You might love it as it is, but we don’t always nail the setup on the first take. For example, you might realize that the couch would be better in a different spot, or that your lighting or color zones would look better if you switched them around.
There’s no doubt that some choices are more permanent than others. Where you install your appliance hookups is pretty much where your appliances have to go. But you can easily rearrange elements like chairs, couches, TVs, desks, and even sleeping areas.
Are Container Homes Safe?
Container homes are safe when properly built, inspected, and finished with non-toxic materials. The steel structure can be more resilient than a traditional wood frame. Safety largely comes down to the conversion process.
Proper engineering, licensed contractors, building codes/inspections, and vetted materials eliminate the main risks associated with container living. Let’s take a look at the safety attributes of container homes. Then we’ll examine some common mistakes to avoid.
Structural Safety
- Shipping containers are built from high-strength weathering steel designed to withstand heavy loads and harsh sea conditions, making them naturally durable and fire-resistant out of the box.
- When stacked or modified for residential use, proper engineering ensures the structure can handle additional stories or roofing without compromising integrity.
- The alloy used in most containers is Corten steel, which resists corrosion by forming a protective outer rust layer. That said, homes in coastal or high-salt environments will need more frequent maintenance to keep that protection working.
Fire and Weather Resistance
- Steel construction makes container homes non-combustible, giving them a significant edge over traditional wood-framed houses in terms of fire resistance.
- Insulation and ventilation are as much safety features as they are comfort amenities. just comfort features, they’re safety ones. Without them, heat transfer and condensation buildup can create real problems inside a steel shell.
- Weatherproofing, protective coatings, climate control, and a functional roof system help to provide long-term durability against rain, snow, and temperature extremes.
Chemical and Health Considerations
- Some used containers come with treated wooden floors or interior coatings that contain hazardous chemicals, including chromate or phosphorus compounds.
- Safe conversion means either removing those materials altogether or sealing them off. Then, finish the interior with non-toxic paints and materials to protect indoor air quality.
Compliance and Maintenance
- Container homes are subject to local building codes and zoning regulations, which vary significantly by state and municipality. Research your jurisdiction before you commit to a site.
- Electrical and plumbing work should be handled by professionals with actual experience in container modifications, not just general contractors unfamiliar with the format.
- Plan for regular maintenance: rust prevention and structural inspections are non-negotiable if you want to hit the 25–30 year lifespan that a well-maintained repurposed container can realistically achieve.
The short answer is that container homes are safe as long as they’re properly built. A container home that’s been engineered, inspected, and finished with non-toxic materials is a genuinely sound place to live.
Common Mistakes to Avoid When Building a Shipping Container Home
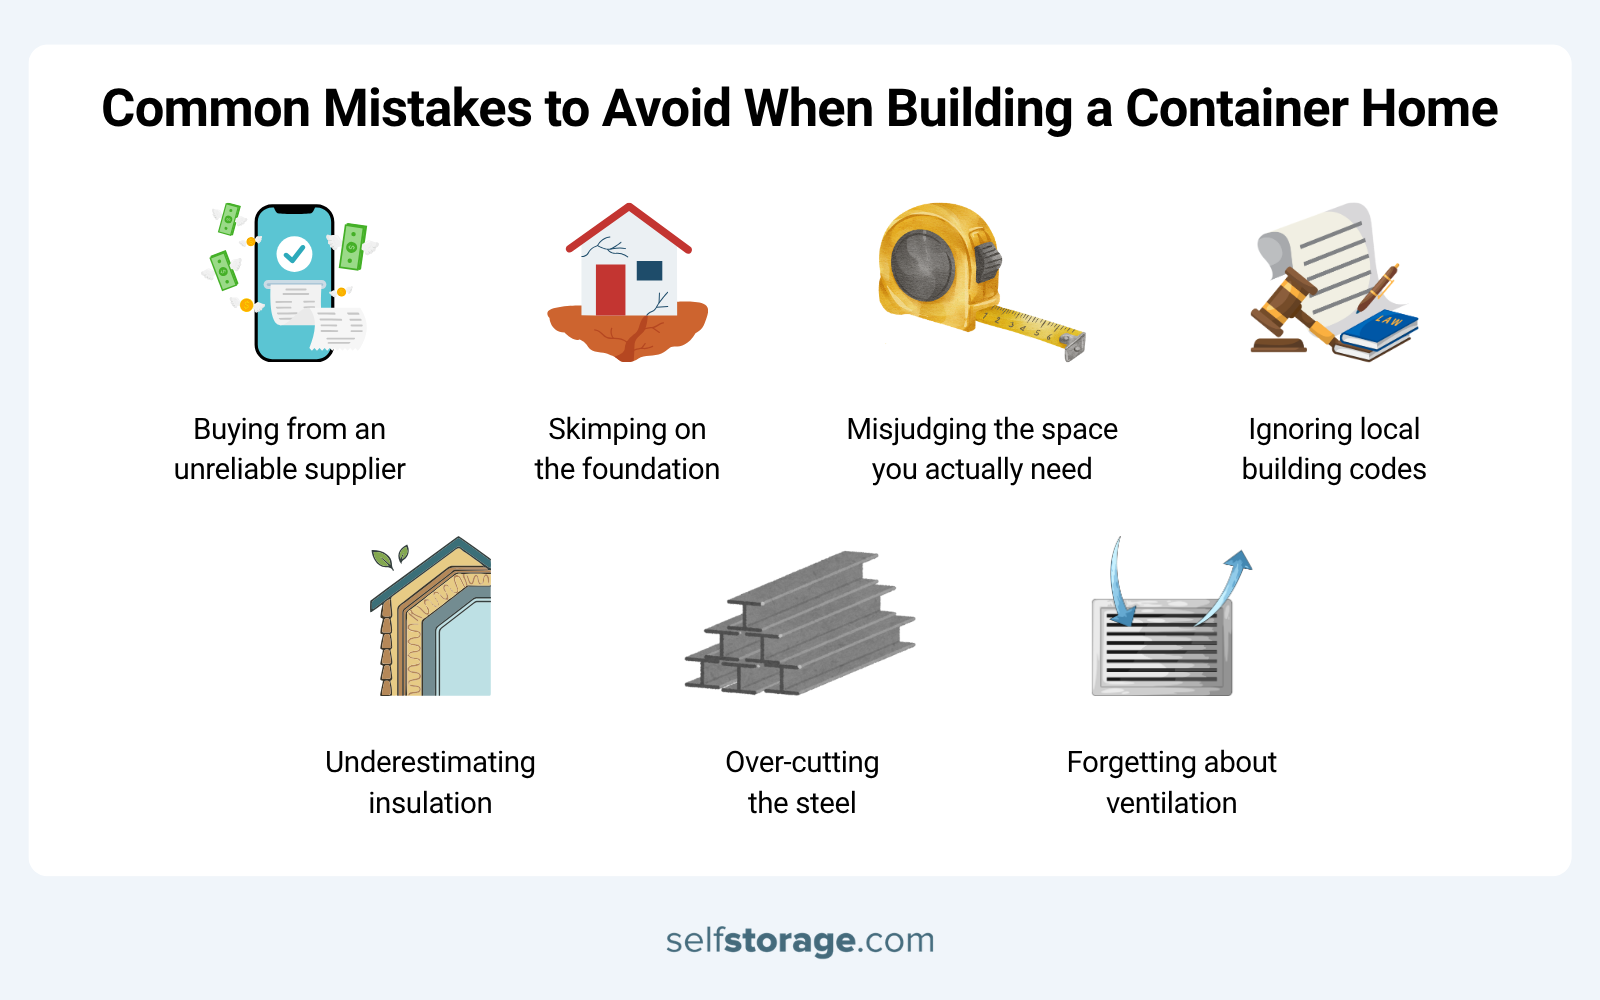
You can enhance the safety and resilience of your container home by avoiding these common mistakes.
- Buying from an unreliable supplier. Not all containers are equal. Purchasing from an unvetted source increases the risk of receiving damaged, chemically treated, or structurally compromised units that cost far more to fix than you saved upfront.
- Skimping on the foundation. A weak or poorly matched foundation will cause structural problems down the line. The foundation needs to be engineered for the specific weight and layout of your build, so don’t cut costs.
- Misjudging the space you actually need. A 20ft container looks different on paper than it does in person. Work out your square footage requirements before committing to a container size.
- Ignoring local building codes. Permits and zoning regulations vary widely by municipality. Skipping this step doesn’t make the requirements go away as much as it risks turning them into fines and renovation projects down the road.
- Underestimating insulation. Poor insulation in a steel structure doesn’t just translate to discomfort and a lack of winter preparation. It also means expensive energy bills and moisture intrusion that can damage the interior over time.
- Over-cutting the steel. Containers get their structural strength from their walls and corner posts. Cutting too many openings for windows and doors without proper reinforcement weakens the entire frame.
- Forgetting about ventilation. Steel doesn’t breathe. Without a proper ventilation plan, moisture builds up quickly, leading to mold, poor air quality, and a container living environment that’s uncomfortable at best and hazardous at worst.
Pros and Cons of Container Homes
Whether you went the DIY container home route or opted for a prefabricated modular home built from shipping containers, there are some benefits and drawbacks you can expect. Pros include affordability, sustainability, speed of construction, durability, and customization options. The cons are permitting challenges, insulation complexity, limited width, and potential chemical contamination.
But there are pros and cons to any home design. The table below goes into more detail on the pros and cons specific to container homes:
| Pros | Cons |
|---|---|
| Eco-friendly by design. Giving a retired container a second life keeps it out of the scrap yard. If the conversion is done carefully enough to preserve structural integrity, a container home gives you a significant sustainability win. | Tight dimensions. Container living means working within a long, narrow rectangle. Without combining multiple units, there’s a ceiling to what single-container layouts can comfortably accommodate. |
| Quicker construction timeline. The steel containers already have an outer shell. The rugged structure allows builders to skip one of the most time-consuming phases of traditional construction. Some smaller builds wrap up in a matter of weeks, and a prefab home arrives ready for move-in. | Insulation is complicated. Steel conducts temperature rather than resisting it, and the already compact interior shrinks further once you install your insulation. Builders typically turn to spray foam or natural materials like cork and wool to minimize the spatial hit. |
| Easy to expand. Individual containers can be combined horizontally or stacked vertically to create significantly larger homes. Multi-story configurations are achievable, but they require more upfront planning and structural enhancements. | Every modification adds work. Each new window or door opening requires reinforcement with steel rods and additional welding. The more changes you make, the more the structural engineering bill grows. |
| Extensive customizable options. Rooftop terraces, loft spaces, large-format windows, and open floor plans are all on the list of potential design options. There are numerous customizable options available regardless of whether you’re working with a contractor, going the DIY container home route, or ordering a prefab home from a manufacturer. | Specialist labor can be hard to source. Container builds require contractors who understand the format. Depending on location, finding professionals with genuine experience in container-specific plumbing, electrical, and HVAC work can be a real obstacle. |
| Built to take a beating. The same properties that make containers reliable at sea translate well to residential use. They’re resistant to fire, extreme weather, and biological decay. Rust management is really the only ongoing structural concern. | Used containers come with unknowns. You need to inspect a used container before you can be sure it’s liveable. It may have held toxic cargo, been exposed to chemical floor treatments, or accumulated moisture or wear. Used container inspection adds time and cost to the front end of any project, and requires a certain amount of know-how. |
| Distinctive visual character. The industrial aesthetic that defines container architecture has moved well beyond niche appeal, attracting homeowners who want something that looks genuinely different from conventional residential construction. | Permitting can be an uphill battle. Many municipalities have no clear approval pathway for container homes, which means navigating variance requests and review processes that don’t apply to conventional builds. Depending on your jurisdiction, the permitting process alone can add high costs and months of delays before construction even begins. |
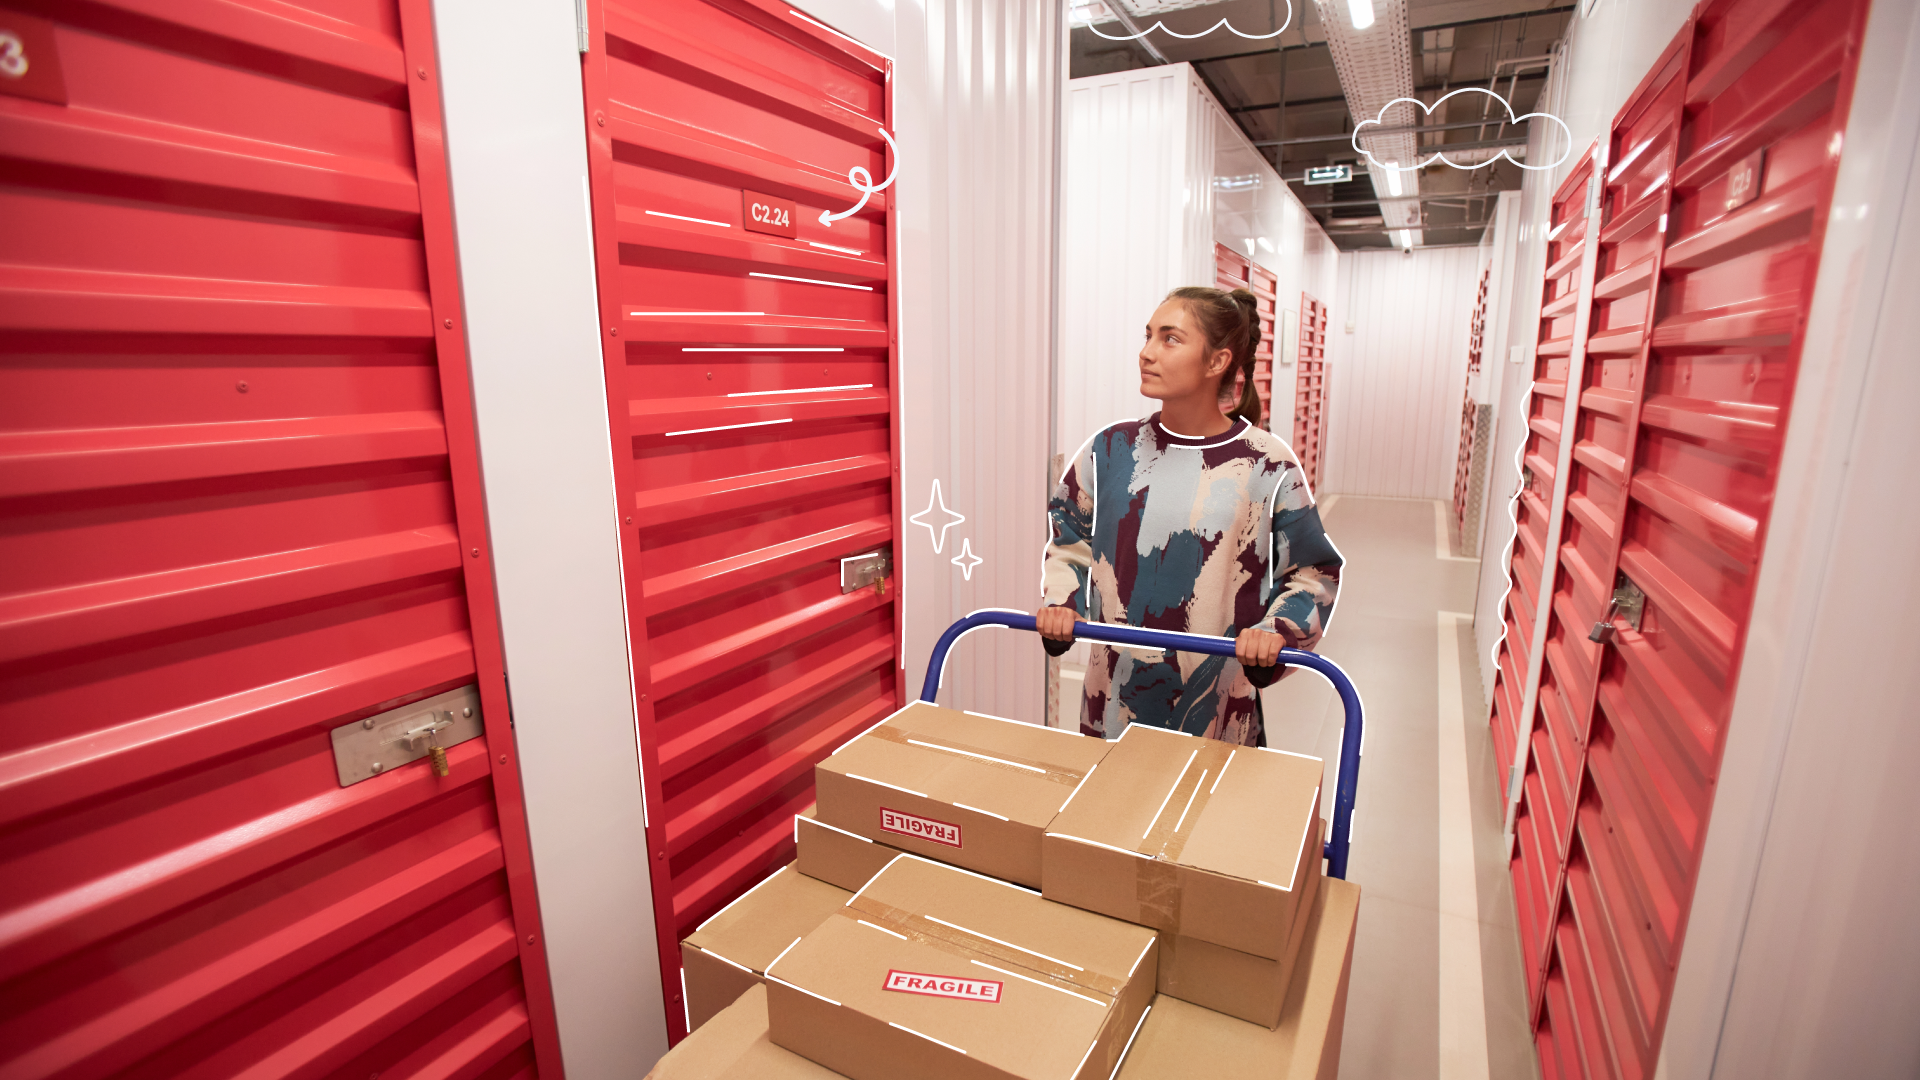
Using Self Storage During Your Container Home Build
Ready to start your shipping container home build project? Whether you’re piecing together prefabricated modular homes or executing a DIY container home build, you’ll need somewhere to put your stuff until the house is done.
Whether you’re building your container home on your own or hiring contractor laborers to help, self storage speeds up the process. Having clear access to work areas and space to maneuver tools and materials makes building your container home more efficient.
This increase in efficiency often saves more money in reduced labor costs than the storage cost itself, making self storage a sound investment rather than an extra expense.
Like any construction environment, the container home fabrication and conversion process can be rough on your possessions. Renovation dust can permanently damage electronics, fabrics, and artwork. And remodeling creates hazards from flying debris, chemical exposure, and heavy machinery.
What commonly gets damaged during renovation projects:
- Electronics: Dust infiltration voids warranties, costs $500-2,000 per device to repair
- Upholstered furniture: Professional cleaning runs $150-400 per piece, and replacement costs much more
- Artwork and photos: Irreplaceable items require specialized restoration ($300-1,500+ per piece)
- Clothing and linens: Construction dust and chemical exposure can permanently damage fabrics
SelfStorage.com has helped over 100,000 families navigate home improvement projects through our network of 5,000+ facilities nationwide. Our month-to-month flexibility and specialized moving supplies make us particularly valuable for unpredictable construction timelines that can shift by weeks.
Climate-controlled storage units maintain 55-85°F temperatures and 30-50% humidity levels year-round, preventing the warping, cracking, mold, and pest damage that can occur in fluctuating conditions. Protecting your valuables saves money in the long run. Replacing a damaged piano, antique furniture, or family heirlooms could cost $5,000-25,000+.
Construction projects, especially DIY ones, often happen outside the 9-5 hours. And you’ll probably need access to your belongings outside of business hours as well. That’s where 24-hour self storage comes into the picture.
24-hour self-storage lets you retrieve items, drop off materials, pick up tools, or check on your unit as soon as you need to. They often feature secure gate codes and well-lit facilities, making your 24/7/365 safe and feasible throughout your DIY container home construction project.
How SelfStorage.com Can Help When the Container Home Build Is Done
Container homes are a viable, affordable option when built correctly. That said, once your build is done, you’ll want to keep your space clear and open, since containers are narrow by design. In some cases, transitioning into a container home means downsizing your belongings.
We already covered tips like using color and lighting to create zones and choosing your furniture with storage and flexibility in mind.
Another approach is acknowledging that not everything needs to live in your daily space.
Holiday decorations, winter clothes during summer months, pool accessories in December, and camping gear that comes out twice a year. These seasonal items eat up significant amounts of space when they’re not being used. Climate-controlled storage keeps these items in perfect condition while freeing up your closets for things you actually need right now.
Family heirlooms, childhood keepsakes, and collections that took years to build have value that goes beyond their practical use, but they don’t all need to be displayed simultaneously.
And if you’re using your container home as an office space or business center, inventory and supplies can make your house feel more like a warehouse than an office. Storage units with electricity can accommodate business needs and maintain a healthy boundary between work and personal space.
Hobby equipment, sports gear, musical instruments you play occasionally, and exercise equipment that’s seasonal all deserve to be kept, but they don’t need to dominate your living space when they’re not in active use.
Well-organized self storage works like an extension of your home. But keep in mind that self storage unit sizes vary. You can use our self storage size guide to not only make sure you have enough storage space, but also to make sure you aren’t paying for more space than you need.
A 5×5 unit holds about one room’s worth of belongings, while a 10×10 can accommodate furniture and boxes from a two-bedroom apartment. Always air on the smaller side at first, keeping in mind that you can upgrade if need be.
But how do you find the exact storage unit size you need in a location that’s not too far away from yor container home? And what if you need amenities like climate control, 24-hour access, drive-up storage, or free truck rentals to move stuff back and forth?
That’s where we come in.
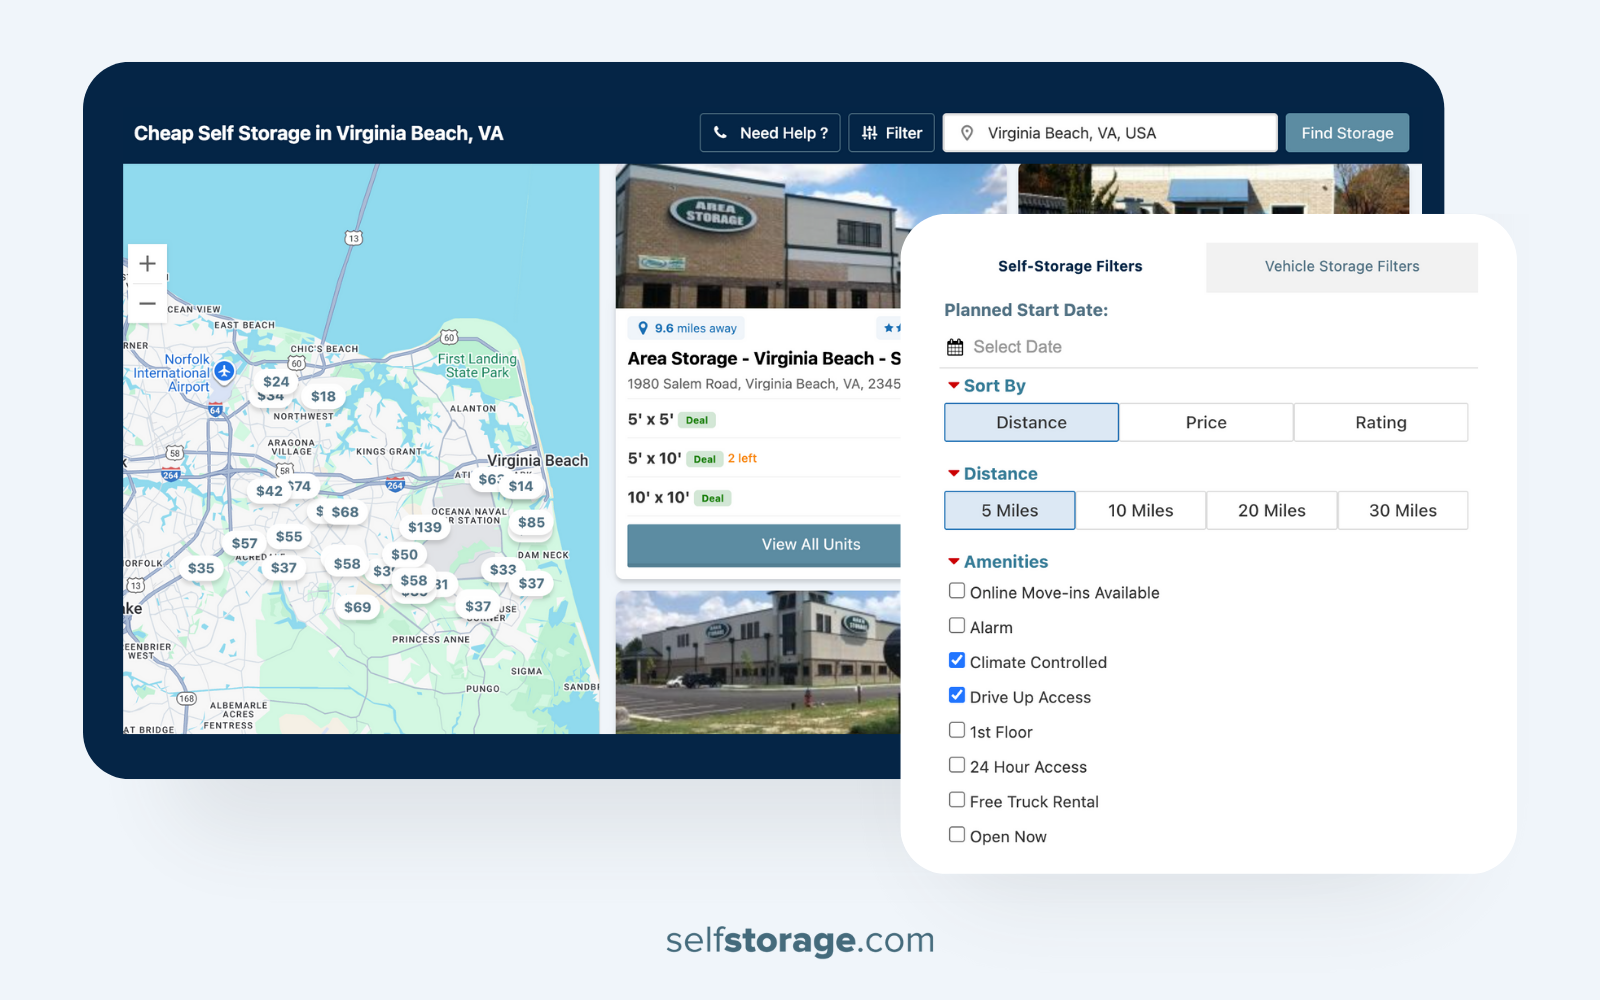
Simply enter your zip code into our signature SelfStorage.com unit locator tool. Use our amenity filter to narrow your search results to the storage unit sizes and features you need. Our self storage map will show you exactly where the facilities are, so you can find the ones that are most convenient to reach from your container home’s location.
SelfStorage.com gives you instant access to more than 20,000 storage facilities nationwide to find a cheap storage unit near you. We’ll help you compare prices and unit sizes. When you find the ideal storage unit, we’ll reserve it for you for free in minutes. No commitment and no credit card required.