Article takeaways
- Learning how to organize a closet that actually holds starts with emptying everything out first. Skipping that step is why most attempts don’t last.
- The best closet organization tips start with categorizing what you own before buying a single bin, which saves money and keeps the wrong organizers off your shelves.
- Zoning by frequency of use (daily items at eye level, seasonal items above) makes a system automatic to maintain.
- Small closets benefit most from vertical thinking: double-hanging rods, slim velvet hangers, over-door organizers, and shelf risers.
- Off-season and rarely used items belong somewhere other than your everyday closet.
You open the closet, reach for one specific shirt, and somehow end up holding four things that aren’t it. The shirt is in there. You know it is. But getting to it means shifting the stack on the left, moving the bag hanging off the rod, and hoping nothing falls off the top shelf in the process. By the time you find it, you’re already annoyed, and you’re not even out the door yet.
That’s the problem with a closet that needs organizing: it doesn’t just waste space. It wastes time every single day on something that should take about ten seconds. Learning how to organize a closet, and doing it in a way that actually holds, comes down to sequence. Most attempts fail not because of bad products or limited space, but because steps get skipped or done out of order. The five-step process below works for everything from a cramped reach-in to an overflowing walk-in, with closet organization tips specific to small spaces and different closet types, plus guidance on when a self-storage unit makes more sense than trying to compress everything into the space you have.
What You’ll Need
Gathering supplies before you start sounds like a small thing, but it’s what keeps the project from stalling halfway through when you realize you need another trash bag or can’t find a marker. Plan for two to four hours for an average bedroom closet, and a bit more if it’s a larger walk-in or a linen closet that’s been collecting things for a while.
Supplies:
- Three trash bags labeled: Donate, Trash, Relocate
- A label maker ($20–$40 for a basic model) or masking tape and a permanent marker
- Storage bins or baskets (clear bins run $10–$30 each; fabric baskets $8–$20)
- Slim velvet hangers (a pack of 50 runs $15–$20, versus $5–$10 for an equivalent set of bulky plastic ones)
- Shelf risers, if needed ($15–$25 per pair)
- A tape measure
That last item matters more than most people expect. Buying organizers before you know your shelf depth, the height between shelves, or your hanging rod length is one of the most avoidable closet organization mistakes there is. A $25 bin that’s two inches too deep creates a new problem instead of solving one, so take five minutes to measure before you shop.
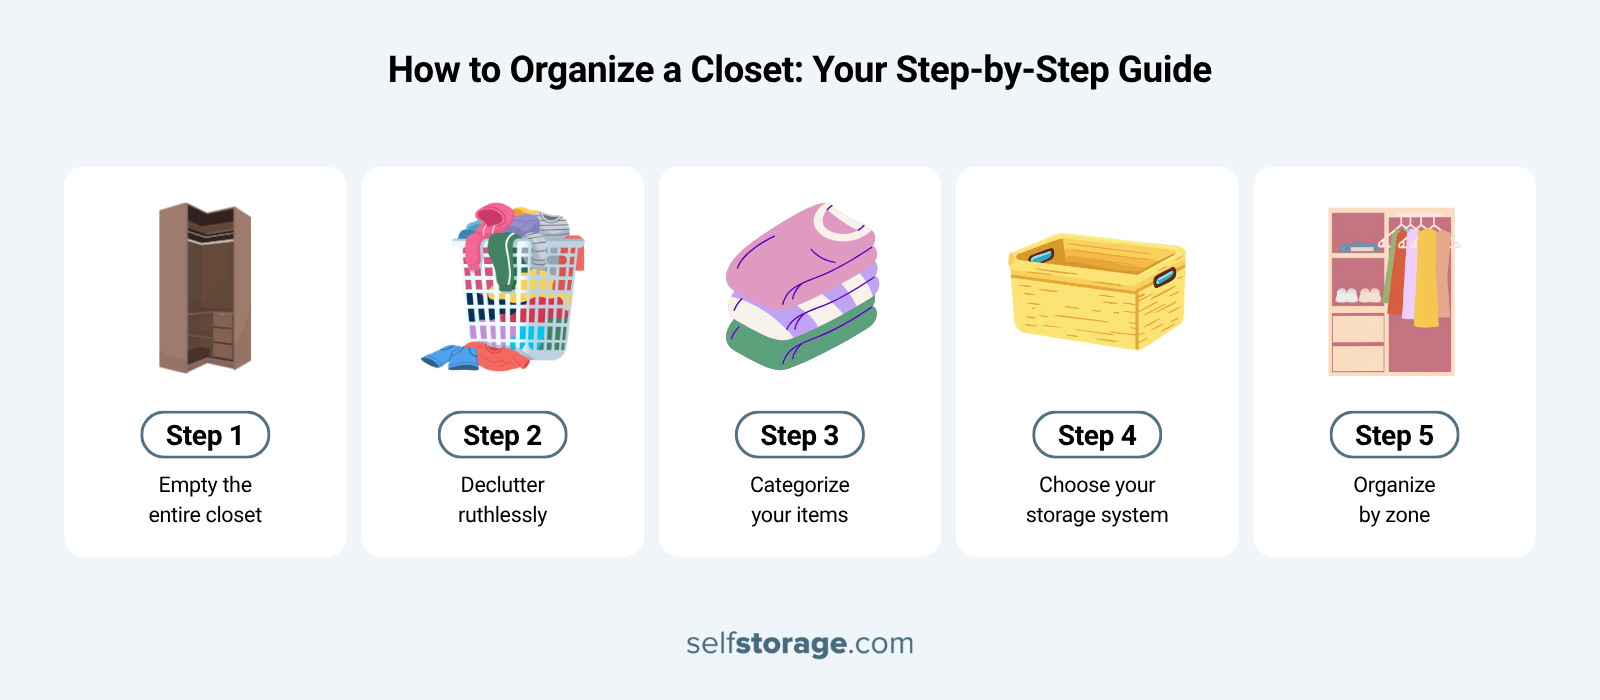
Step 1: Empty the Entire Closet
Pull everything out. Every hanger. Every box on the floor. Every bag stuffed into the back corner you’ve been stepping around for six months. Working around existing clutter is exactly how disorganized closets stay that way, and it’s the step most people skip in the interest of saving time, then wonder why the result doesn’t feel like much of an improvement.
Once the space is fully empty, do something most guides don’t mention: wipe down every shelf and vacuum the floor before anything goes back in. It sounds minor, but a clean surface changes how the space feels and gives you a clearer picture of what you’re actually working with. This is also the moment to check the structure itself. Are the shelves adjustable? How much height do you have between them? Does the door swing eat into wall space you’d otherwise use? What’s actually possible on the floor zone? These details shape every product choice and arrangement decision that follows, and the only way to see them clearly is with the closet empty.
Step 2: Declutter Ruthlessly
With everything out in the open, sort each item into four piles: Keep, Donate, Toss, and Relocate. Anything that belongs in another room goes directly into the Relocate pile. Dealing with it now, rather than letting it drift back in, is what prevents the decision fatigue that stalls most organizing sessions.
For clothing, the 12-month rule is a reliable starting point: if you haven’t worn it in the past year, it probably doesn’t belong in your primary closet. Special-occasion pieces and seasonal items are worth judging on a case-by-case basis. But for everything else, a few quick questions tend to cut through the indecision:
- Have I used this in the past 12 months?
- Does it fit, and is it in good condition?
- Would I buy it again at full price today?
- Does it have a specific home in this closet?
If most of those answers are no, move it out.
Donation centers like Goodwill and Salvation Army accept clothing and household goods during regular hours, and many offer free pickup scheduling online for larger loads, which is useful if you’re doing a broader home edit rather than just the closet. If clutter is showing up in multiple rooms, understanding why your home feels smaller than it is can help you zoom out and look at the bigger picture.
Getting the volume right in this step is what gives the rest of the process somewhere solid to land. Even the best system breaks down under too much stuff, so the excess has to come out before anything goes back in.
Step 3: Categorize Your Items
Before anything goes back into the closet, group like items together. Categories make finding things easier day to day and make it immediately obvious when something is out of place. More practically, this step shows you exactly what storage products you need, which is why it comes before shopping. Skipping it and buying first is how you end up with a cabinet full of bins that almost work.
Categories by closet type:
- Clothing closet: Tops / bottoms / dresses / outerwear / shoes / accessories
- Linen closet: Sheets organized by bed size / towels / washcloths / extra blankets
- Hall closet: Bags and backpacks / cleaning supplies / seasonal items / games and toys
Subcategories are worth adding when the volume warrants them. A larger wardrobe might separate work clothes from casual, or group tops by sleeve length for faster getting-dressed decisions. A shared linen closet often works better with towels sorted by bathroom (master, guest, kids) rather than by type alone, so sets stay together and nothing gets separated into halves that are no longer useful to anyone.
Taking photos of each pile before moving on gives you an easy visual reference when you’re standing in a store trying to remember whether you have two bins’ worth of accessories or five.
Step 4: Choose Your Storage System
With your categories in front of you, you can shop with an actual list. Matching containers to categories, not the other way around, is what separates a closet organization project that lasts from one that just looks good for a week.
Storage matched to item type:
- Folded clothes: shallow drawer units or shelf dividers ($15–$40 for a basic set)
- Shoes: clear stackable boxes ($2–$5 each) or an over-door shoe organizer ($20–$50)
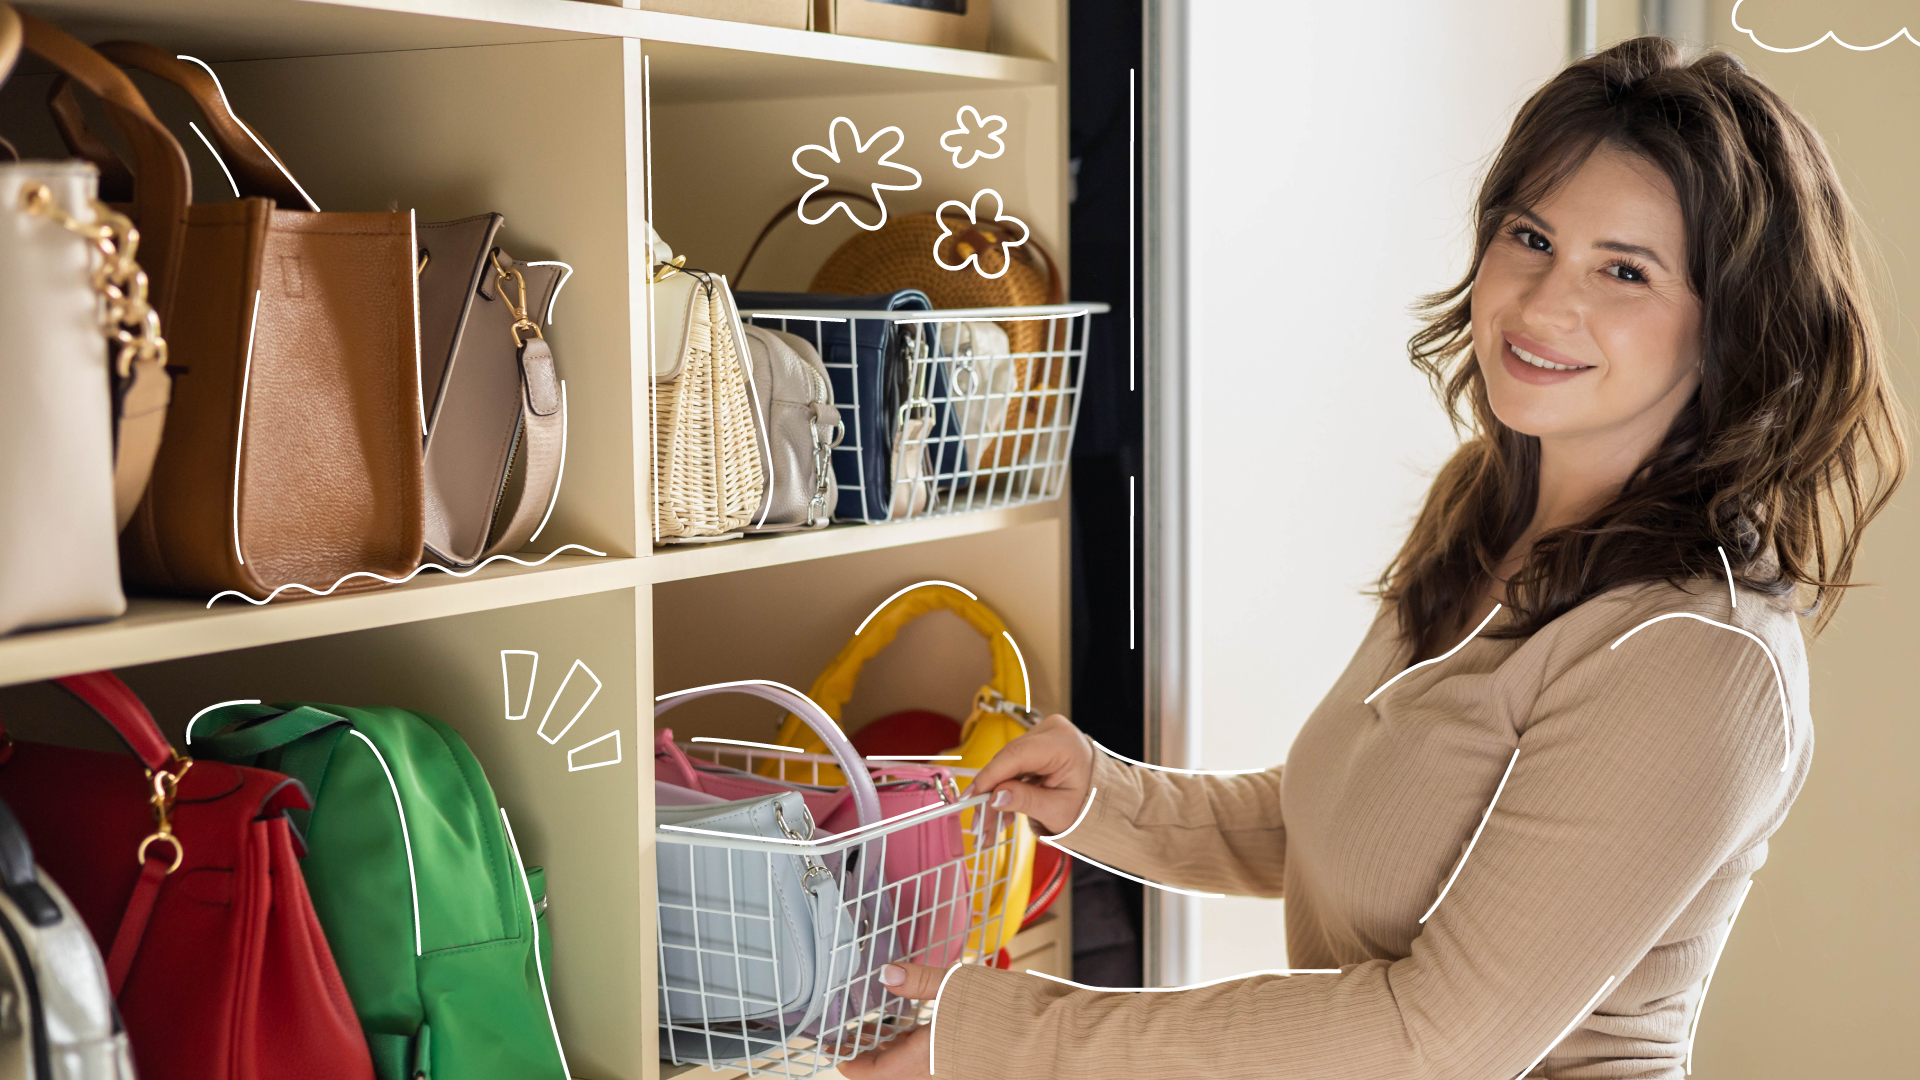
- Bags and purses: hooks, S-hooks on the rod, or open cubbies
- Seasonal items: large lidded bins ($15–$30 each), stored on the highest shelf
- Small accessories: drawer dividers ($10–$20) or wall-mounted pegboard sections
Clear bins cost a little more and earn it. Being able to see contents at a glance, without pulling everything out, saves real time and keeps the system running without much maintenance. For items on high shelves or in secondary spaces, labeled opaque bins work just as well at a lower cost.
If you’re working with limited shelf depth or height, vertical closet storage strategies can meaningfully expand what your closet holds without adding square footage. Shelf risers, stackable bins, and tiered organizers use height rather than floor space, and that matters in every closet, but especially smaller ones.
Step 5: Organize by Zone
With categories sorted and containers ready, everything goes back in, intentionally this time. Things you reach for every day belong at eye level, in the area you can access without bending or stretching. Everything else works around that.
Zone layout:
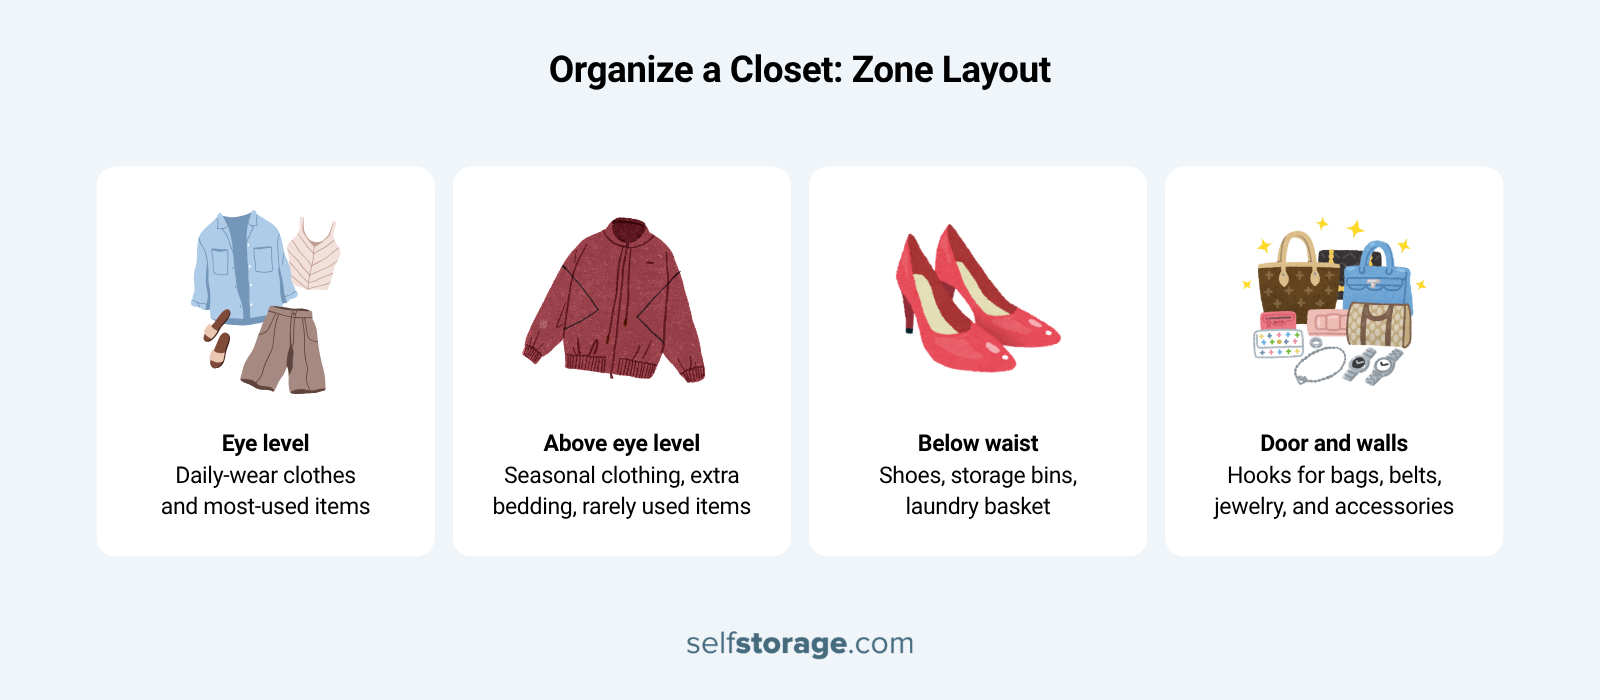
- Eye level (prime zone): Daily-wear clothes and most-used items
- Above eye level: Seasonal clothing, extra bedding, rarely used items
- Below waist: Shoes, storage bins, laundry basket
- Door and walls: Hooks for bags, belts, jewelry, and accessories
Zoning isn’t about a perfectly curated look. It’s about making the everyday version of your closet automatic, so returning items after laundry or getting dressed in the morning doesn’t require any real thought. That consistency is what makes a system sustainable rather than a project you find yourself redoing every six months. When the zone layout is right, the closet manages itself, and that’s the whole point.
How to Organize a Small Closet
Small closets operate by different rules, and that’s especially true for reach-in closets, apartments, and studio spaces where every inch is doing double duty. Before you buy a single organizer or install anything, move the off-season items out. Winter coats in July, heavy sweaters in August, ski gear in April. None of it belongs in a closet; your current wardrobe needs. Move them to a self-storage unit, a secondary closet, or even under the bed. Wherever gets them out of the way. That one step, more than any product or installation, is what creates room to actually work with. If you’re thinking about small-space living more broadly, practical strategies for smaller homes are worth a look.
Once you’ve done that, think about what you’re working with differently. Figuring out how to organize a small closet is almost entirely a vertical problem. The floor, the back of the door, and the wall space above the rod. Every surface has a job to do.
The upgrade that moves the needle most for most people is switching to slim velvet hangers. It sounds small, but moving from standard plastic to velvet hangers can recover 30–40% more rod capacity, without drilling, installing anything, or spending more than $15–$20 for a pack of 50. Do that first. Then assess what you’re actually working with before deciding what else you need.
From there, a second rod below the primary one is the next highest-impact addition for most reach-in closets. A basic closet doubler runs $15–$30, requires no permanent installation, and roughly doubles your hanging space for short garments like shirts and folded pants. After that, an over-door organizer ($20–$50) turns the back of the door into storage for shoes, accessories, or cleaning supplies, and is especially useful in reach-in closets where wall space is limited.
Shelf risers ($15–$25 per pair) turn a single shelf into two storage levels and work well for folded items, small bins, or shoes. Wall hooks above the rod or just inside the door frame handle: bags, hats, and scarves without competing for shelf or floor space.
The goal isn’t to implement all of this at once. It’s to work through it in the order that gives you the most room back, as quickly as possible, so the closet is functional again before the project loses momentum.
Closet Organization Tips by Type
Reach-In Closets
Reach-in closets are the most common and often the most frustrating. You can see everything, but accessing items at the back means moving things at the front, and the floor zone becomes a pile faster than anywhere else in the house. The fix is treating both zones as deliberate storage rather than overflow space.
Double hang wherever garment length allows. If there’s no shelf above the rod, adding one creates immediate storage for folded items or bins. For the floor zone, a small drawer unit or a structured shoe rack keeps it from reverting. If your bedroom already feels cramped, a cluttered closet and a cluttered bedroom usually reinforce each other, and small bedroom storage strategies address both at once.
Walk-In Closets
A walk-in gives you room to build real zones: one wall for hanging, one for shelving and drawers, and a center island or freestanding dresser if the footprint allows. More space is a genuine advantage, but it also makes it easier to avoid the hard decisions. Things pile up in a walk-in differently than in a reach-in. Not in one visible heap, but spread across shelves and floor zones where it’s easy not to notice until the whole system has quietly stopped working.
The fix is the same as any other closet: clear categories, matched containers, and zones that reflect how you actually use the space. The difference is that you have room to do it properly. One wall for hanging, one for folded items and drawers, and floor space reserved for shoes and bins only. If a walk-in has become more of a drop zone than a system, a full empty-and-reset using the five steps above is the fastest way back.
Matching bins and consistent labels make a walk-in genuinely easy to maintain over time. When there’s room to hide the mess, it’s easy to shove things in the wrong spot without noticing. Labels close that loophole.
Linen Closets
Linen closets tend to suffer from the same issue: more stuff than system. Fold and store towels as complete sets by bathroom (master, guest, kids) so sets stay together, and you’re never hunting for a matching pillowcase at midnight. Label each shelf by category, and use clear bins for backup toiletries and cleaning products so you can see what you have without pulling everything out.
Most linen closets need a quarterly reset more than an annual overhaul. Fifteen minutes every few months keeps inventory current and prevents the shelves from becoming a catch-all. If you’re already planning a seasonal home refresh, a spring refresh of the whole house is a natural time to bring the linen closet into the rotation.
When to Move Items to a Storage Unit
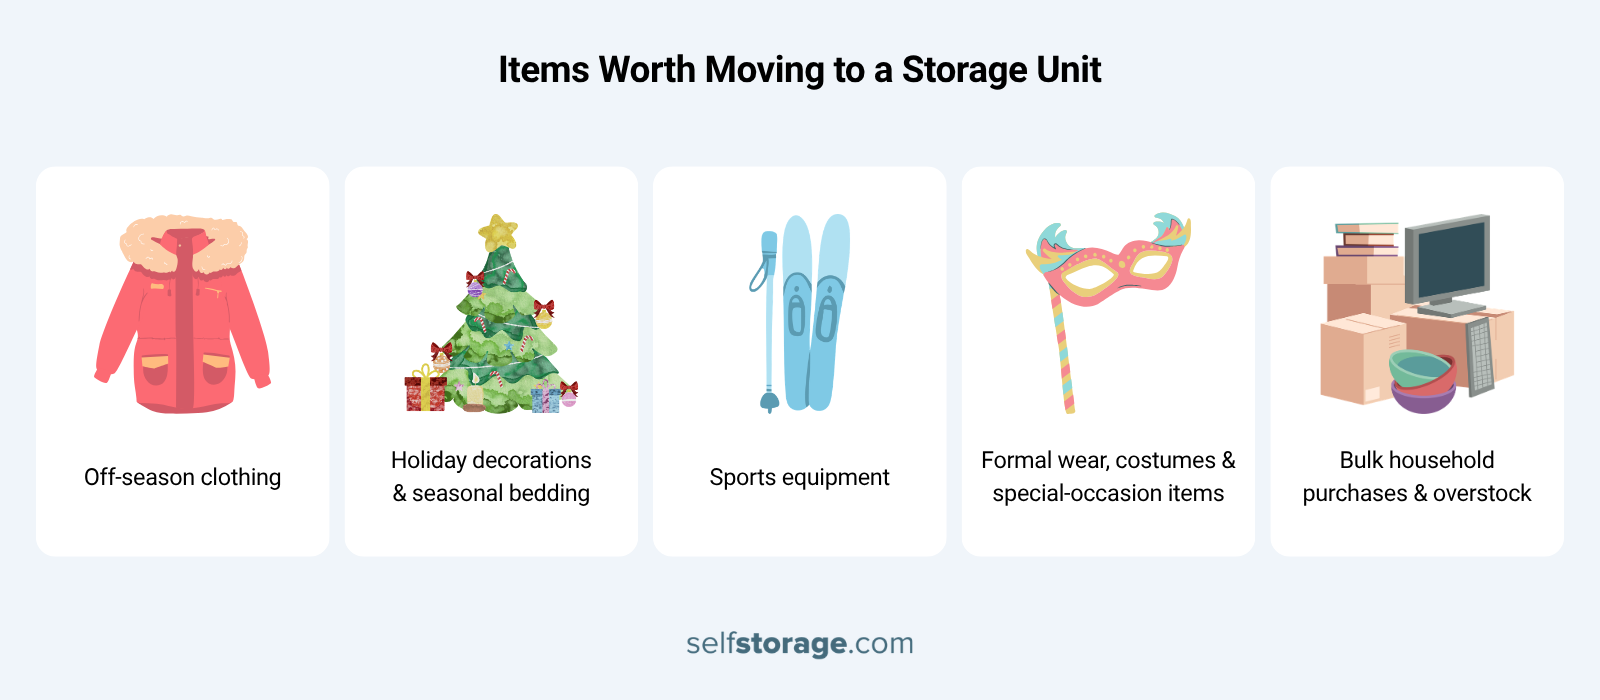
If your closet stays overstuffed despite consistent organizing, the problem may not be the system. It may be volume. Some categories of items are better suited to self-storage, and moving them out keeps your home closets functional year-round without requiring you to get rid of things you actually use.
Items worth moving to a self-storage unit:
- Off-season clothing (winter coats in summer, warm-weather gear in winter)
- Holiday decorations and seasonal bedding
- Sports equipment, used for only a few months per year
- Formal wear, costumes, and special-occasion items are worn once or twice annually
- Bulk household purchases and overstock
If you’re in the middle of a larger home edit, this guide to downsizing your home offers a practical framework for deciding what to keep, sell, and store, and a self-storage unit can serve as a flexible staging ground while you work through those decisions. Not sure which rental length fits your situation? This breakdown of short-term vs. long-term self-storage covers costs and best-use cases for each.
Your home closet handles the daily rotation. Self-storage handles everything else, so neither space ends up doing a job it wasn’t built for.
Find self-storage units near you and compare options by size, price, and location.